How to Build an Issue Tracker Dashboard with Appsmith
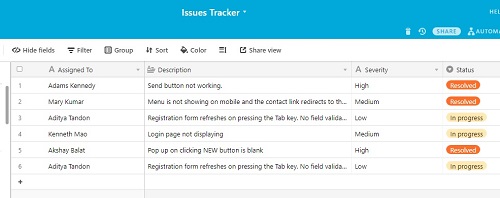
06 Feb 2021The Issue Tracker tool we will be building in this tutorial can be used by a tech support team in any organization to track and resolve complains and issues as raised by customers or users of a particular software product. Below are images of the finished tracker:
![]()
The Tracker will be build using Appsmith – a JavaScript based development platform used for building internal tools swiftly and Airtable – a cloud database service.
First Things First
Before you start building, first do the following;
- Visit this link to Sign Up for a free Appsmith account (that is if you don’t have one already. If you do, proceed to the next item)
- Sign Up for the free version of an Airtable account
- Sign into your airtable account after confirming your e-mail and click on Add a base from the My First Workspace section of your account. Create a database that has the same structure like the one in the image below;
STEP 1: Sign into your Appsmith account and click on Create New under your personal organization
You will be re-directed to a new page for the new app
STEP 2: The new app is created with the default name Untitled Application 1. Rename it to Issue Tracker Dashboard.
The new app by default comes with new directories as seen in the image below
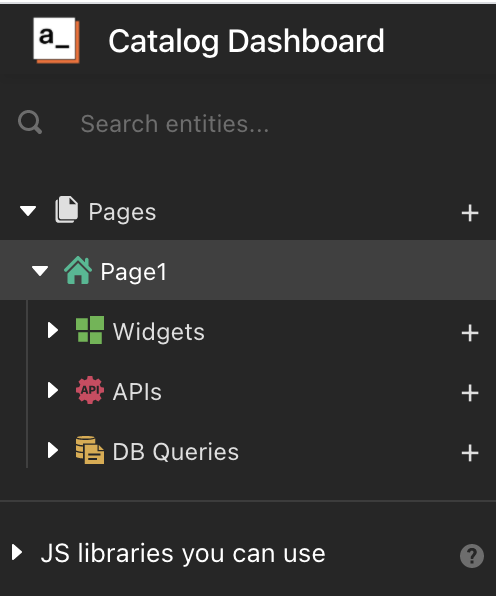
Pages is the container for all the pages of your app. Page1 is the container holding the following entities;
Widgets, a container for all the widgets that will be used on Page1,
APIs, a container for all APIs that Page1 connects to,
DB Queries, a container for all databases and their queries used by Page1 to read and write data.
The Issue Tracker app will contain 2 pages. The first page will list all the issues that have been submitted and the second page will contain the add issue form for submitting new issues.
STEP 3: Rename Page1 to IssuesListPage
STEP 4: Set up the required API for connecting to the Airtable database which allows for connection using REST API. Click here to view the API documentation on how to setup a GET request to the Issues (table in the Issues Tracker database) endpoint. In appsmith, Click on + to the right of APIs. Then click Create new (IssuesListPage > APIs > Create new).
STEP 5: Rename your API to AirtableGET, copy and paste the URL from Airtable API documentation and enter Authorization and Bearer API_KEY under Headers as shown in the image below:

STEP6: Click on + to the right of Widgets, to add a TABLE widget (IssuesListPage > Widgets). Drag and drop the TABLE widget to the canvas on your right. This will create a new table.
STEP7: Click on Table1 in the left panel to open the property-pane of the table widget. In the property-pane, click on Table1 to change its name to IssuesTable.
STEP8: Select and delete all the content of Table Data in the table’s property-pane and write in the below JavaScript code in between double curly braces:
AirtableGET.data.records.map(item => item.fields)
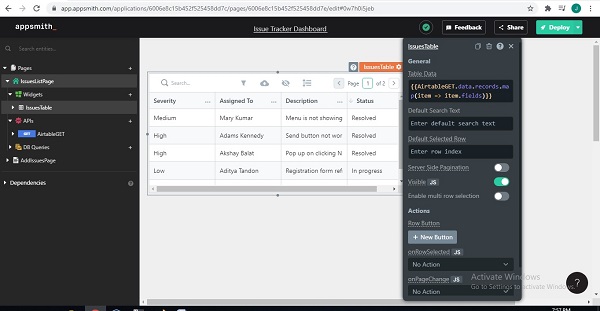
This will link up your table to the API data pulled in from Airtable. If you have followed the steps correctly up to this point, you should be able to see the records from airtable displayed in the IssuesTable like in the image below:
STEP9: Next, we add the second page of our application that will contain the add issue form. Click on IssuesListPage to minimize it.
STEP10: Click on + beside Pages to add a new page to the app.
STEP11: Rename the new page to AddIssuesPage.
STEP12: Click on + beside Widgets to add a new widget.
STEP13: Drag and Drop the FORM widget unto the canvas.
STEP14: On the left panel click Form1 to open its property-pane.
STEP15: In the property-pane, rename Form1 to IssuesForm, change Background Color from white to #D9D9D9
STEP16: Click on Form at the top of the form and rename it to Add Isssue
STEP17: Drag and drop the RICH TEXT EDITOR widget unto the form and, inside its property-pane, rename it to DescriptionInput. Drag and drop the TEXT widget above the DescriptionInput field and rename it to Description:
STEP18: Drag and drop the DROPDOWN widget unto the form (below DescriptionInput) and, inside its property-pane, rename it to SeverityDropdown. Drag and drop the TEXT widget above SeverityDropdown field and rename it to Severity:
STEP19: Drag and drop the INPUT widget unto the form (below SeverityDropdown) and, inside its property-pane, rename it to AssignToInput. Drag and drop the TEXT widget above AssignToInput field and rename it to Assign To:
STEP20: Delete the RESET button and rename the text value of the SUBMIT button (in its property-pane) to Add Issue.
If you followed up to this stage without missing a step, you should have a form similar to the one in the image below;
![]()
STEP21: Next, Click on + beside APIs under the AddIssuesPage (AddIssuesPage > APIs > Create new) to set up a POST request to update the airtable database whenever the form is filled and submitted.
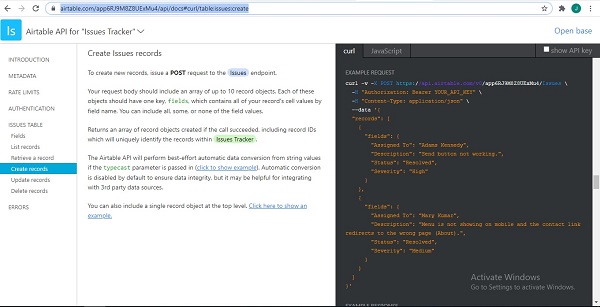
STEP22: Visit https://airtable.com/api, click the database name (Issue Tracker) and navigate to the Issues Table section to view the API documentation on how to make a POST request to the Issues endpoint;
STEP23: Rename the API to AirtablePOST and fill in the URL, Headers and body as shown in the images below;

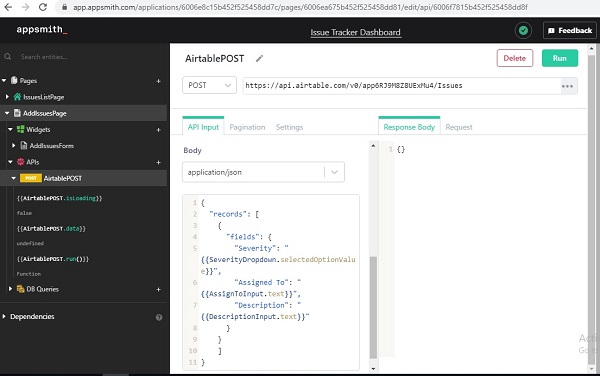
STEP24: On the AddIssuesForm open the property-pane of the Add Issue button and fill in the following for each of the fields;
STEP25: Click inside the onClick field, click Call An API and click AirtablePOST
STEP26: Click inside onSuccess field (onSuccess > Show Message) and type Success! Issue was Added in the message field
STEP27: Click inside onError field (onError > Show Message) and type Fail! Issue was not Added in the message field
What we’ve done above is to bind the form to the AirtablePOST so that each time the fields in AddIssuesForm are filled and submitted (by clicking the Add Issue button), the AirtablePOST runs, creating and setting a new record on the airtable database. Then we added success and error messages to alert us if the issue was added successfully or if it was not.
Now the Issue Tracker app is functional. Deploy it and try adding an issue. Then open the IssuesListPage to verify it was added. Also open the Airtable database to confirm the record has been added.
Links To Video Tutorial
Mantoss